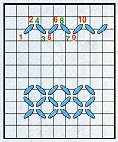
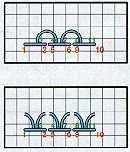
Use the following diagrams to expand your knowledge of Plastic
Canvas stitching. For each diagram, bring the needle up through the canvas
at the red number1, and go back down through the canvas at the red number
2. The second stitch is numbered in green. Always bring the needle up through
the canvas at odd numbers, and take it back down through the canvas at the
even numbers. Stitches are usually categorized into three types: Background,
Embroidery, and Finishing.
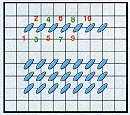
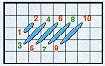
Background Stitches
Background stitches are used for filling
in large areas of canvas. The Continental Stitch is the most commonly used
stitch for this purpose. Other stitches, such as the Scotch Stitch and Slanting
Gobelin, fill in large areas of canvas more quickly than the Continental
Stitch because their stitches cover a larger area of canvas.
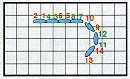
Alternating Continental
Continental Stitch
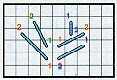
Scotch Stitch
Slanting Gobelin
Long Stitch
Cross Stitch
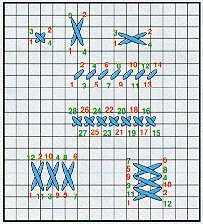
Embroidery Stitches
Embroidery stitches are worked on top of
a stitched area to add detail and beauty to your project. Embroidery stitches
are usually worked with one strand of yarn, several strands of pearl cotton,
or several strands of embroidery floss.
Lazy Daisy
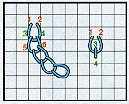
Chain Stitch
Straight Stitch
Backstitch
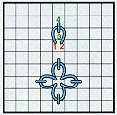
Smyrna Cross
Loop Stitch
Finishing Stitches
Finishing stitches are used to finish the
outer edges of the canvas. Overcasting is done to finish one edge at a time.
Whipstitching is used to stitch two pieces of canvas together. For both
Overcasting, and Whipstitching, work one stitch in each hole along straight
edges, and inside corners, and two to three stitches in outside corners
Overcast/Whipstitch
Questions or comments? Contact teresa@tsplace.com Copyright 1997-2017 Teresa Crawford. Not for commercial use without permission