![]() Materials Used:
Materials Used:
(2) 7 count White Plastic Canvas Mesh
![]() Needloft Yarn:
Needloft Yarn:
Sign:
#15 Brown - 6 yds.
#43 Camel - 28 yds.
#35 Sail Blue - 4 yds.
Sparkled Blue - 1 yd.
Gingerbread Cookie:
#14 Cinnamon - 2 yds.
#16 Sandstone - 7 yds.
#00 Black - 1 yd.
Sparkled Purple - 1 yd.
Milk Container:
#37 Silver - 2 yds.
#41 White - 6 yds.
#03 Burgundy - 3 yds.
#05 Lavender - 3 yds.
#00 Black - 1 yd.
Sparkled Pink - 1 yd.
Heart Sugar Cookie:
#16 Sandstone - 6 yds.
#56 Fleshton - 7 yds (or #40 Beige)
Sparkled Colors - 2 yds. in total
![]() For Finish Project:
For Finish Project:
Crafters Wire
![]() Stitches Used:
Stitches Used:
Continental Stitch
Reverse Continental Stitch
Whipstitch
Cross Stitch
Overcast
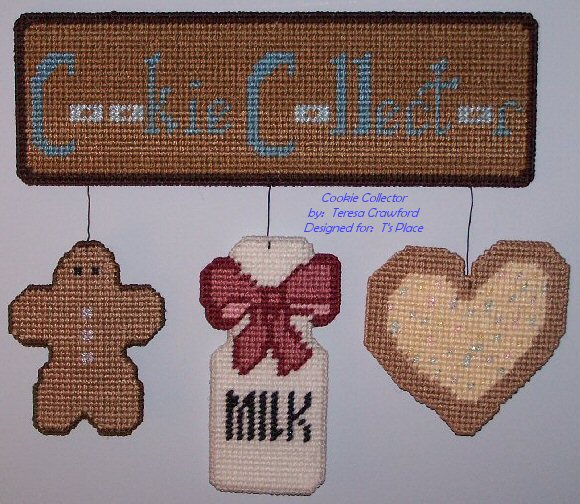
![]() Instructions:
Instructions:
To start out with, I would suggest you work each piece seperately and completely before moving on to the next. With that said, cut out 2 pieces 91X32 (90X31 holes) for the Sign. Stitch 1 piece according to the pattern. The o's are stitched in a sparkled blue. When completed, whipstitch to the unstitched piece with Brown #15. Cut out 1 Gingerbread Cookie, 28X35 (27X34 holes). Stitch as according to the pattern. Don't forget that the eyes are crossed stitched and the buttons are stitched in a sparkled purple. Overcast in Cinnamon #14. Cut out 1 piece 25X47 (24X46 holdes) for the Milk Container. Stitch the pattern accordingly. The inner lighter pink is stitched in a sparkled pink. Overcast in Silver #37. Cut out 1 Heart Sugar Cookie, 36X35 (35X34 holes). Stitch piece as indicated on pattern. leaving the sprinkles for last and stitched in sparkled colors. Overcast with Sandstone #16. Cut the craftes wire into 3 stripes about 3 inches each. Connect 1 piece of wire to the top of each Gingerbread Cookie, Milk Container and the Heart Sugar Cookie shown in the finished project. Then attach the other end of each wire to the bottom of the sign, where you would like each to hang from. I folded the wire in & under the sign and the other pieces so you couldn't see the ends. You can add another piece at the top of the sign for a hanger, but I found that you could still hang it up without a hanger, just by clipping the small nail head into the back of the sign so it lays flush against the wall.
