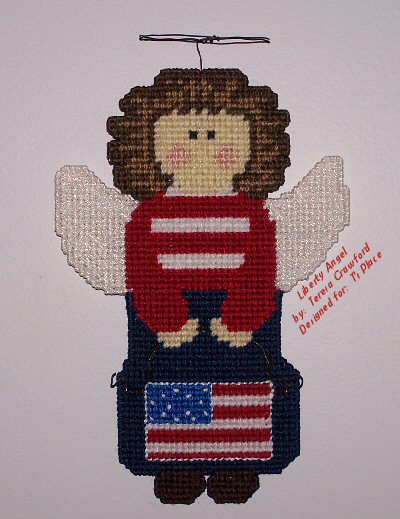
Liberty Angel
Materials Used:
(2) 7 count Clear Plastic Canvas Mesh
#321 Red DMC #3 Thread - 2 yds. (outline for shirt)
White DMC #3 Thread - 1 yd. (outline & knotes for flag)
Crafters Wire - 15 inches (hanger for Liberty Angel)
Crafters Wire - 11 inches (hanger for flag)
Needloft Yarn:
#39 Eggshell - 3 yds. (face & hands)
#32 Royal - 1 yd. (flag)
#43 Camel - 2 yds. (highlights in hair)
#41 White - 2 yds. (shirt & flag)
#56 Fleshtone - 1 yd. (cheeks)
#01 Red - 7 yds. (shirt & flag)
#48 Dark Royal - 7 yds. (skirt)
#00 Black - 1 yd. (eyes & rope)
#14 Cinnamon - 4 yds. (hair)
#15 Brown - 2 yds. (shoes)
Darice Bright Pearl Cord White - 7 yds. (wings)
Stitches Used:
Continental Stitch
French Knots
Cross Stitch
Embroidery Backstitch
Whip Stitch
Instructions:
Cut 2 pieces of 50X74 threads (49X73 holes) for front and back. Stitch 1 piece of cut canvas according to the pattern. When done, using the outline pattern, backstitch the shirt in red and the flag in white. Plus, using the white DMC thread do the 13 French knots in the flag, as indicated with red dots. Feed the 11 inches of crafters wire through the canvas starting at the angel's hands and then over the black stitches down towards the flag on both sides. Use the black dots on the outline pattern to indicate where to feed the wire in & out, if you wish. This will be slightly tough to do, but take your time so as not to break the canvas, using small pliers if you need to. Curl the ends of both sides of the wire - you can do this but wrapping the wire around a pencil to give it the curled look.
Whipstitch the stitched piece of canvas to the unstitched piece of canvas. Whipstitch with the adjoining colors, use the finished project as a guide. Once complete, take the other piece (should be about 15 inches) of crafters wire and make a small loop at one end, wrap end around the wire so the loop stays in tack. Feed the other end of the wire behind the Angel at the top of her head, so the wire is between both pieces of canvas. Leave about an inch of the wire sticking up from the head before the loop - this will give a halo effect. You can use the finished project as a guide.
Questions or comments? Contact teresa@tsplace.com
Copyright 1997-2017 Teresa Crawford. Not for commercial use without permission
Back to T's Place!
